 Accessible Shopfront
Headings and page structure
By the end of this step: you will be able to give each page a clear title, a tidy heading outline, real lists and the main page regions.
The short version
- Give every page its own clear title.
- Use real headings, in order, like a table of contents.
- Use real bulleted and numbered lists.
- Mark out the main parts of each page: header, menu, main content and footer.
Why structure matters
You can see that a big bold line is a heading. A screen reader can't. It is software that reads a page aloud. It only knows what the page's code tells it.[1]
So the structure must be built in, not just shown with style. When it is, people can jump from heading to heading.[2] W3C calls headings one of the most important tools for screen reader users.[1]
This is WCAG success criterion 1.3.1 Info and Relationships (Level A). It says structure you can see must also be in the code, or written out in words.[3]
Step 1: Give each page a clear title
The page title is the name shown in the browser tab. It is not the same as the big heading on the page.
A screen reader says the title first when a page opens.[4] People also use it to tell their open tabs apart.[4]
WCAG 2.4.2 (Level A) says each page needs a title that describes its topic or purpose.[3] Put the page's own name first, then your business name.[1] Each page should have a different title.[4]
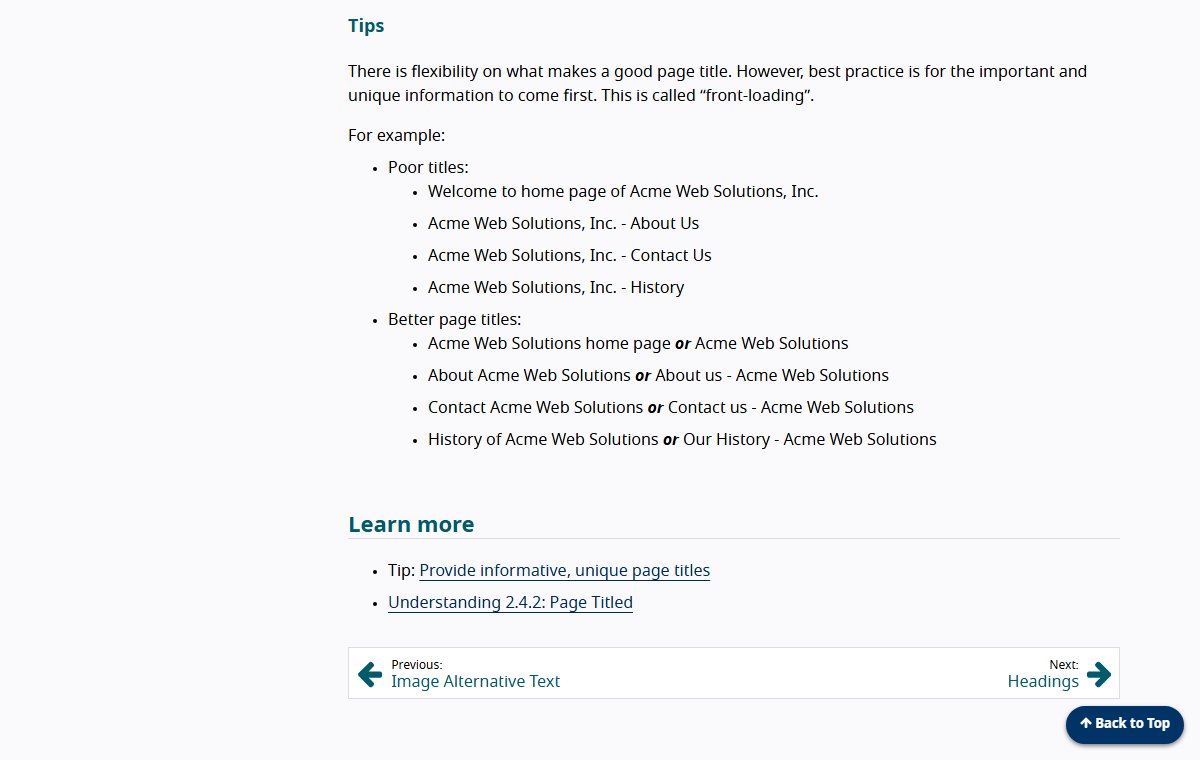
For example, "Contact us - Accessible Shopfront" works better than "Accessible Shopfront - Contact us". The useful part comes first.
Step 2: Build a heading outline
Headings show how a page is organised.[2] They come in six levels, from Heading 1 down to Heading 6.
- Use one Heading 1 for the main topic of the page.
- Use Heading 2 for each main section.
- Use Heading 3 for a part inside a Heading 2 section.
Nest them in order.[2] Don't jump from Heading 2 straight to Heading 4. W3C says skipped levels can confuse people.[2]
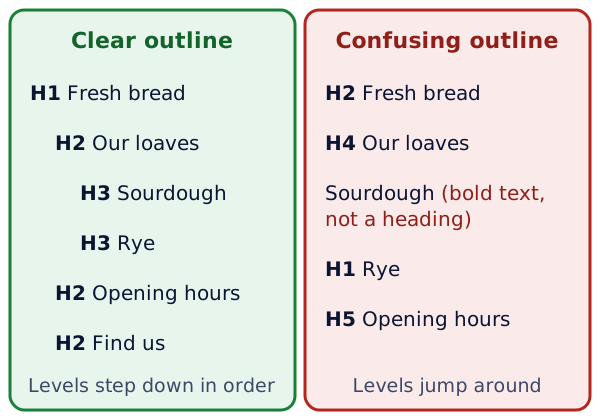
Also make each heading say what the section is about. WCAG 2.4.6 (Level AA) asks for headings that describe the topic.[3] "Opening hours" is clear. "Come and see us!" is not.
Tip: in your website editor, pick a heading style from the text menu. Don't just make normal text bigger or bold. That only changes how it looks.[1]
Step 3: Use real lists
If you have a group of items, use your editor's list button.
- Use a bulleted list when the order doesn't matter, like the products you sell.
- Use a numbered list for steps in order, like how to book.[5]
Real lists help people find their way through your content.[5] A row of dashes typed by hand doesn't do this.
Step 4: Mark the main regions
Most pages have the same main parts. HTML has a special element for each one. Screen readers and browsers can then find each part.[6]
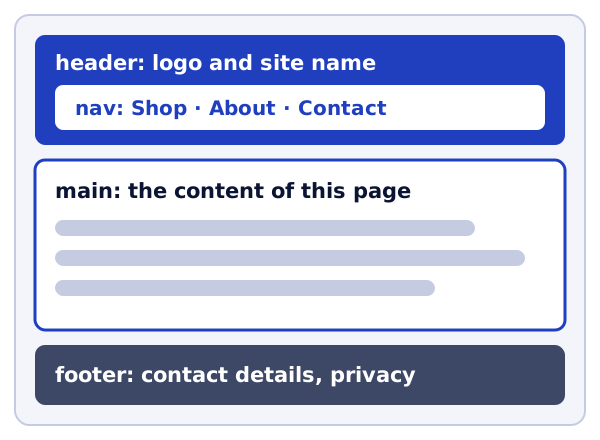
- The
<header>element holds the top of the page, like the logo.[6] - The
<nav>element holds a menu of links.[6] - The
<main>element holds the main content of this page.[6] - The
<footer>element holds the bottom of the page, like contact details.[6]
You may never see this code. Many themes and website builders add these regions for you. Your job is to check they are there. Step 9 shows you free tools that can help.
Try it on your site
- Open three pages of your site in separate tabs. Read each tab's title. Is each one different, with the page name first?
- Pick your busiest page. Write down its headings in order, with their levels.
- Look for any skipped levels, or bold text pretending to be a heading.
- Fix one page today. Then use it as the model for the rest.
Sources
- Writing for Web Accessibility, W3C Web Accessibility Initiative (accessed 2026-10-18)
- Headings (Page Structure Tutorial), W3C Web Accessibility Initiative (accessed 2026-10-18)
- Web Content Accessibility Guidelines (WCAG) 2.2, W3C (accessed 2026-10-18)
- Page Title - Easy Checks, W3C Web Accessibility Initiative (accessed 2026-10-18)
- Content Structure (Page Structure Tutorial), W3C Web Accessibility Initiative (accessed 2026-10-18)
- Page Regions (Page Structure Tutorial), W3C Web Accessibility Initiative (accessed 2026-10-18)